How to Replace Cabin Filter for Cleaner Air in Your Car?
Maintaining a clean cabin air is vital for a healthy driving experience. A crucial component in achieving this comfort is the Cabin Filter. This filter works tirelessly to remove dust, pollen, and other pollutants from the air entering your vehicle. It’s easy to overlook its importance, yet a dirty cabin filter can lead to a less enjoyable ride.
Many drivers might not realize how often this component needs replacing. Over time, the cabin filter collects debris, reducing its effectiveness. Neglecting this replacement can lead to bad air quality inside the vehicle. In some cases, drivers report unpleasant odors filtering in, which can deter from an enjoyable drive. You might question, “When did I last replace my cabin filter?”
There are straightforward steps to replace it, ensuring a cleaner air supply for you and your passengers. This simple maintenance task can enhance both comfort and health. It gives you control over the air quality in your vehicle, making each journey more pleasant. Taking the time for this task is not just about upkeep; it reflects your dedication to a healthier environment inside your car.
Understanding the Importance of a Cabin Filter in Your Vehicle
The cabin filter plays a vital role in maintaining air quality within your vehicle. It filters dust, pollen, and pollutants from the air. Without a functional filter, these particles can enter the cabin and affect your health. The air inside your car can become more polluted than the outside. This is surprising for many drivers.
Many overlook the need to replace their cabin filter regularly. A clogged filter can lead to reduced airflow. You might notice strange odors or increased allergens if it's neglected. It's easy to forget about this component, yet it directly impacts your driving comfort.
Some people may have difficulty accessing the cabin filter. The location can vary by vehicle type. If unsure, consult your manual for guidance. This process may seem daunting, leading some to delay it indefinitely. However, investing a little time can yield cleaner air. Regular checks can help keep you and your passengers healthier.
Identifying the Right Cabin Filter for Your Car Model
When replacing the cabin filter in your car, choosing the right filter for your specific model is crucial. Each vehicle has unique requirements. Start by consulting your car’s manual for details on filter size and specifications. This step ensures you don’t waste time or money on the wrong part.
Next, consider visiting an auto parts store or an online retailer. They often provide tools to help you find the right filter based on your make and model. If you’re unsure, asking an expert can prevent mistakes. Sometimes, filters may look similar but have different compatibility. Choosing the wrong filter can lead to poor air quality.
Pay attention to the installation process too. Some filters may require tools or special techniques. A tight fit is essential for effective air filtration. Taking shortcuts can lead to leaks or reduced performance. Observe the old filter’s condition as a guide for future replacements. This can help you understand when it’s time for a change. Making informed decisions leads to cleaner air and a more pleasant ride.
How to Replace Cabin Filter for Cleaner Air in Your Car? - Identifying the Right Cabin Filter for Your Car Model
| Car Model | Cabin Filter Part Number | Filter Type | Replacement Interval (Miles) | Notes |
| Toyota Camry 2018 | 87139-33010 | HEPA | 15,000 | Check annually for better air quality. |
| Honda Accord 2020 | 80292-TVA-A01 | Activated Carbon | 20,000 | Replace more frequently in urban environments. |
| Ford F-150 2019 | FL3Z-19N619-A | Particle | 30,000 | Consider changing earlier if used in dusty areas. |
| Chevrolet Malibu 2017 | 23457570 | Pleated | 15,000 | Check filter condition during routine maintenance. |
Step-by-Step Guide to Locating the Cabin Filter in Your Car
Locating the cabin filter in your car can be tricky. Many owners overlook this component. A clean cabin filter is essential for good air quality. Did you know that up to 25% of indoor air pollution can come from vehicle air systems? That’s significant. Breathing in contaminants can lead to health issues.
To find the cabin filter, check your owner's manual. This guide often includes diagrams. In most vehicles, the filter is located behind the glove compartment. Remove the glove box to access it. Some older models might place it under the dashboard. This hidden location can be frustrating.
Regularly changing your filter is crucial. Studies show that a clean filter can improve airflow by up to 30%. Neglecting this simple task can lead to reduced efficiency. It can also foster mold growth. Inspect the filter regularly for dirt and debris. If you notice a strong odor, it’s time for a replacement. Keeping this component clean can make a noticeable difference in air quality. Make it part of your routine maintenance. Don’t ignore the signs, and take action.
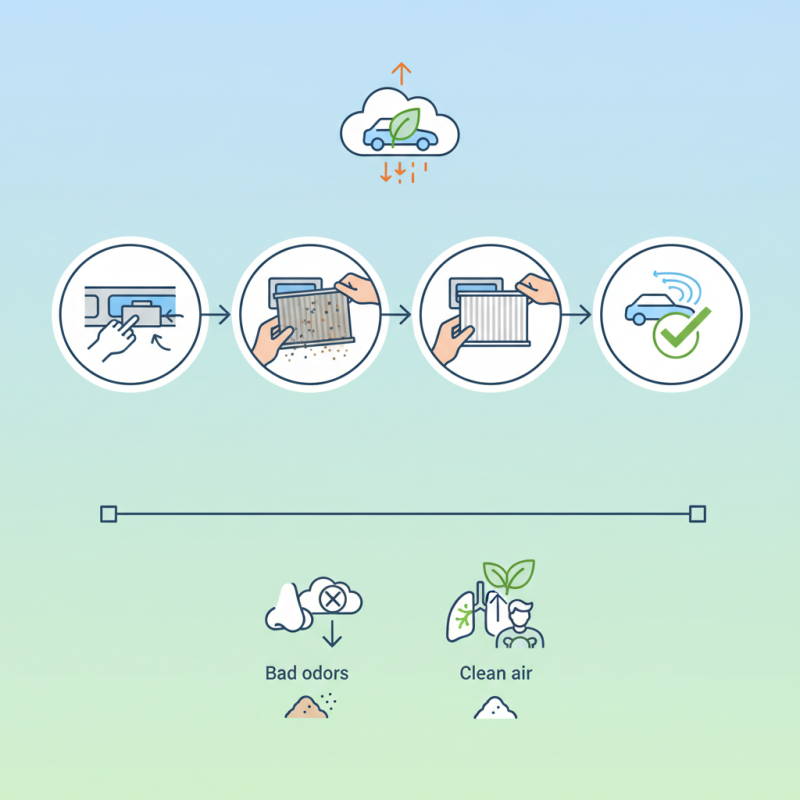
Removing the Old Cabin Filter Safely and Effectively
Removing the old cabin filter is crucial for maintaining air quality in your vehicle. Studies show that cabin filters can trap up to 99% of airborne particles, including dust, pollen, and other allergens. Over time, these filters can become clogged, reducing their effectiveness. A dirty filter can also lead to poor airflow, which makes the air inside the cabin less comfortable.
To safely remove your cabin filter, first, locate its housing. This may require accessing the glove compartment or under the dashboard. Carefully pull out the old filter, but be cautious; debris may fall out. Wearing gloves can protect you from dirt. A recent survey indicated that over 70% of vehicle owners overlook this maintenance step, leading to poor air quality and potential health risks.
Some filters come with specific orientation indicators. Make sure to install the new filter in the correct direction, allowing for optimal airflow. It’s essential to use a filter that meets your vehicle’s specifications. Improper installation can negate the benefits of a new filter. Regularly scheduled replacement of the cabin filter is often neglected. Keeping track of when to change it can significantly enhance your driving experience.
Air Quality Improvement with Cabin Filter Replacement
Installing the New Cabin Filter and Ensuring Proper Fitment
When installing a new cabin filter, proper fitment is crucial. A loose or incorrectly sized filter can lead to debris entering the car. This can diminish air quality instead of improving it. Start by examining the old filter for signs of wear. Dust and leaves caught in the filter are red flags. Pay attention to how it sits in the housing. You want the new filter to fit snugly without gaps.
To ensure a good fit, check the dimensions of the replacement filter. Align it with the old one to compare sizes. Many filters include arrows or markings indicating airflow direction. Make sure to position your new filter correctly. An improper installation can block airflow, causing issues with climate control. Take the time to test and adjust if needed.
Sometimes, installation doesn’t go as planned. Maybe the filter feels too tight or too loose. This can happen if the wrong filter is purchased. If you run into trouble, don’t hesitate to revisit the store with your old filter. A little patience can go a long way in ensuring cleaner air in your vehicle.